How to Use a Hydrometer
This post contains affiliate links which provides us a commission at no extra cost to you.
Read the full disclosure here.
Homebrewers around the world have to jump through hoops to prepare that perfect batch of beer, and one of the things they most fret over is the part where they have to use a hydrometer correctly. This handy little device, a beer maker’s best friend, allows the brewer to measure gravity, track the level of fermentation taking place, and basically determine when the process is complete.
While the hydrometer’s use is a bit intimidating for even the most seasoned of brewers, it is quite simple to operate if one follows the basic guidelines on how to measure alcohol content with a hydrometer. You may have slept through your high school chemistry class, but stick around, as I can promise you that you too can learn how to read a hydrometer.
What Exactly is a Hydrometer?
A hydrometer is the single tool that alerts you to the issues that crop up during fermentation so that you can make adjustments as needed. More specifically, to quote your chemistry teacher, the hydrometer is the device used to measure a liquid’s density with respect to water.
When it comes to brewing beer, the hydrometer is employed to measure the amount of dissolved sugar, or how well the yeast is turning sugar by volume.
There are three types of hydrometers for beer, which can be employed for our objective here. First, you have a triple-scale hydrometer. Then comes the thermo-hydrometer. Finally, we have a precision hydrometer. You can choose what’s best for you based on budget or availability.
What Does the Hydrometer Measure?
Employing the hydrometer for beer alcohol measurements will tell you a couple of things. The foremost of those is how strong the beer is or the amount of potential alcohol it contains.
Another crucial thing that can be ascertained from the hydrometer is the specific gravity of the beer, which is the measure of the beer’s density relative to liquid water. Note that less sugar means that the fermentation process is going on smoothly and as per design.
Now that you’re familiar with the basics, let me walk you through how to use a hydrometer. Follow along, and you’ll find that the process is surprisingly simple.
How to Use a Hydrometer
While making that much-awaited batch of home-brewed beers, you need to take two readings with the hydrometer, namely the wort’s OG (original gravity) and FG (final gravity). The former is to be taken before pitching the yeast, and the latter is to be measured when you can’t see any further sign of fermentation.
One way to accomplish this is by plunging the hydrometer into the wort before the yeast is pitched; make sure that your hands and the hydrometer are sanitized.
There are however two things that could go wrong for you; you might not be able to get an accurate reading during active fermentation or you stand the risk of oxidizing the beer if you open the lid to introduce the hydrometer. Don’t worry, as we have you covered. You can use either of the following means to extract the samples.
Employing a Wine Thief
This method is as simple as inserting a sanitized wine thief or heat resistant turkey baster into the wort to garner the sample, which is to be transferred into a container such as a graduated cylinder so that the hydrometer can float without touching the bottom or sides. Since even this method runs the risk of your beloved beer getting oxidized, we have another method up our sleeve.
Using the Fermenter’s Spigot
If you are reluctant to expose your beer to oxidation (as you should be), just insert a spigot, pull out the sample into the preferred container, and then introduce the hydrometer. It is worth noting that the spigot is to be thoroughly sanitized after the sample is pulled.
Now that you have done the heavy lifting, it’s time to get the readings from the hydrometer.
Correcting and Calibrating a Hydrometer
It’s imperative to note that the hydrometer functions optimally at a particular temperature. While the older ones are calibrated to around 59-60°F, the newer ones can take on up to 70°F. You can find this value in the hydrometer’s instructions.
If you can’t get the reading at this temperature, you can employ the relevant equation or a chart to correct for your sample’s temperature.
Since it is common for the device’s calibration to be off, it makes sense to check it frequently. This can be done by taking distilled water at the temperature equal to your hydrometer’s calibration and checking if the reading is 1.000, which shows it is properly calibrated.
If the value is too high, then don’t worry. You can always shave off a part of the glass from the bottom of the hydrometer until it reaches 1.000 using a file and seal off the shaved part using nail polish or a similar substance. However, if it’s too low, then you can add polish or tape to the hydrometer’s top to make it read 1.000.
Reading the Hydrometer Accurately
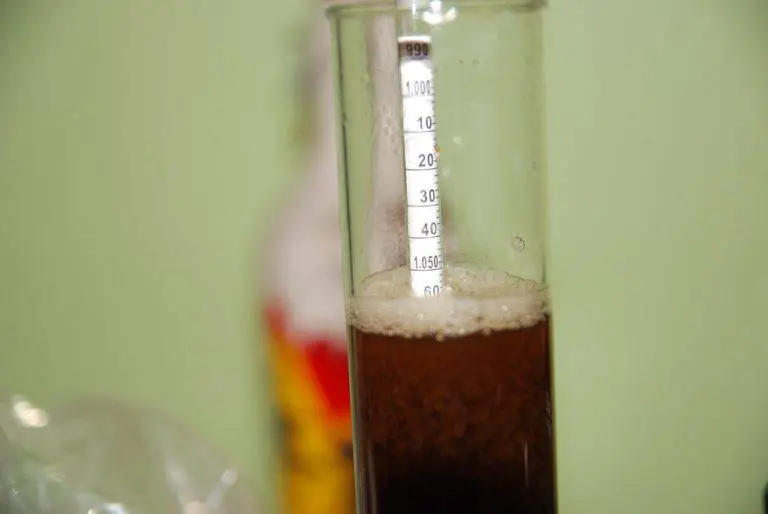
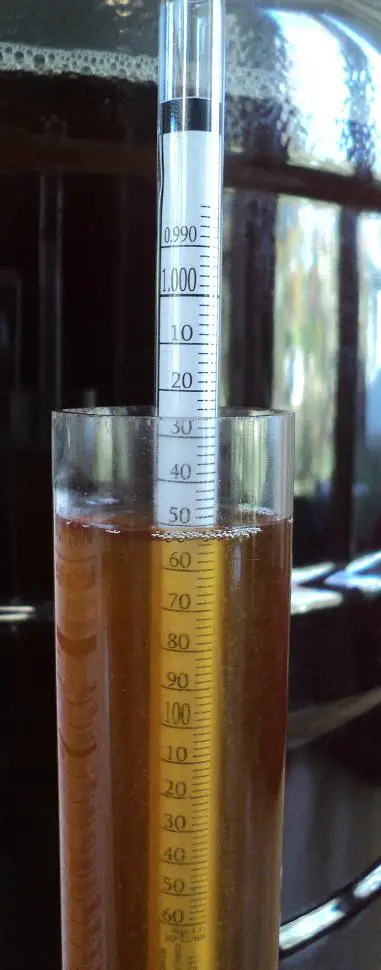
Now that you’re all set, the first thing to do is to place the hydrometer in the fluid and give it a whirl. It ensures that the hydrometer is floating nicely in the container just the way we want it. We certainly don’t want it clinging to the sides of the container.
Now, once the device is settled, proceed to take the reading at the bottom point of the meniscus, which is the curvature of the surface of the wort surrounding the stem. Take the true reading at your eye level so that it’s quite accurate.
Upon finishing this, don’t feel compelled to return the sample as it would cause contamination. Just gulp it, savoring the beer that your hard work has produced.
Take another reading once the fermentation process is over, and this one will be the FG reading while the previous one was the OG reading. Having done this, let’s proceed to determine the amount of alcohol in your brew.
Calculating ABV (Alcohol by Volume) in the Beer
This step is pretty straightforward; all you need to do is use a simple formula. Don’t get nervous- the formula is simple.
All you need to do is subtract the original gravity from the final gravity and then multiply the resultant by the magic number 131.25.
Voila! You have found the ABV%!
Don’t at all worry if the ABV% wasn’t the one you were looking for. You can still hit the sweet spots with the tips we have for you.
Ways to Adjust the Alcohol by Volume of Your Brew
The sugar is the key. That’s precisely where you start if you want to adjust the percentage of alcohol in your favorite beverage. One of the things that you can try is adding fermentable sugar to the mix.
You, however, have to bear in mind that adding this even by a small fraction will increase the percentage of alcohol in the brew by a large margin. Besides, the sugars you are bound to add, such as honey, malt extract, or Belgian candy syrup, will add their flavors to the mix.
Adjusting the Level of the Grind of the Grain
Ensuring that the grains are finely-ground can go a long way in boosting the alcohol content, as the sugars will be more easily absorbed.
Adding or Subtracting the Amount of Base Malt
Since this is where most of the sugars come from, it would make sense to adjust their level based on your requirement to increase or decrease the level of alcohol in the mix.
Fine-tuning the Mash Temperature
Another time-tested way to lessen the level of alcohol is by employing a warm mash. Conversely, a cool mash will give you slightly more alcohol for your buck, and a mid-range mash will give you the perfect balance of both worlds.
Why Is My Hydrometer Reading Too High or Low for My Liking?
Having discussed what to do to adjust the ABV, we also need to know why the specific gravity doesn’t match your expectations. Before you throw in the towel or buy a new hydrometer, here are a few troubleshooting tips that you can try.
There can be a multitude of reasons for the faulty readings, and here are a few:
The Hydrometer is Not Calibrated
This is quite common. If you encounter this, all you need to do is follow the steps that were laid out in a previous section on calibrating the device.
You Haven’t Corrected for Temperature
Density is a phenomenon that changes with temperature. We know that hotter fluids turn up a value of specific gravity that is on the higher end, while the opposite is true for colder fluids. You can fix this by calibrating the hydrometer as per the steps given in the section on calibration.
Maintaining a Clean Hydrometer
While this may sound obvious, you would be surprised to find the number of people who forget to do this. Ensure that the hydrometer is free of all debris, as debris will impede the device’s ability to produce an accurate reading.
Making Sure That the Wort is Mixed Well
Remember me saying to give the fluid a whirl before taking the reading?
This was what I was warning you about. If you don’t mix the wort well, then the heavier sugars sink to the bottom of the kettle or fermenter in a process known as stratification.
Hence, make sure that the wort is well-mixed until its homogenous. You need to pay special attention to this when you make malt extract batches, where the cold water is mixed with concentrated wort in the fermenter.
Conclusion
It took professionals a considerable amount of time before they got it right, but even they are error prone. The key is to have the confidence in yourself and using a hydrometer to believe that you will make an awesome batch of beer and that a few hiccups along the way in the form of a bad reading or two isn’t going to change that. Sit back, relax, and take a swig; you earned that deliciously cold chug!